为什么312能治百病
如何科学操作
信不信无所谓,试试无妨,无副作用。
为什么312能治百病
如何科学操作
信不信无所谓,试试无妨,无副作用。
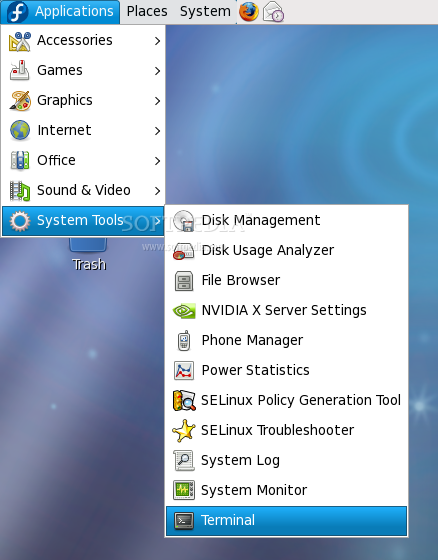
Nvidia finally decided to release an updated version of its proprietary video driver for Linux systems, one that supports the controversial XServer 1.5, which is present in bleeding-edge distributions, such as Fedora 9. Ok, so this tutorial is here to help actual and future Fedora 9 users to install the video drivers for their graphics cards and, as a bonus from Softpedia, a nice step-by-step AWN installation guide, assuming you have a fresh Fedora 9 installation with the GNOME desktop environment. Step 1 - Install the Livna repository First of all, make sure your system is up to date, then install the Livna repository like this: Open a terminal (Applications -> System Tools -> Terminal)...
...and switch to root (system administrator) with the following command: su - Type the root password (the one you have set up when you've installed Fedora). Then, as root, type: rpm -ivhU http://rpm.livna.org/livna-release-9.rpm Now that the Livna repository is installed, you can continue with the driver installation part. Step 2 - Install the Nvidia drivers I presume you did not close the Terminal window; if you did close it, fire it up again from Applications -> System Tools -> Terminal, log in as root and type: yum -y install kmod-nvidia To verify if the installation was successfully completed, reboot your computer, log back in, open up the terminal (Applications -> System Tools -> Terminal) and type: glxinfo | grep direct If the output of the above command is: direct rendering: Yes the Nvidia driver installation was successfully completed and you can now use OpenGL applications and desktop effects such as Compiz Fusion. |
Installing Maya 8 on Fedora Core 8 Linux (with bonus appendix: how to install drivers in Fedora Core appropriate to your Nvidia card) last update June 29, 2008 A tutorial from cgspeed.com Copyright (c) 2008 Bruce Hahne I'm in the process of trying to shift, as much as possible, from Microsoft-based operating systems to Linux for at least some of my work. Advantages of working under a free distribution of Linux include no licensing fees, no need to worry about whether you can reinstall the operating system on different hardware when you upgrade, easy use of all of your RAM, and no worries about whether your OS vendor is intentionally making it more difficult for you to create and edit content or locking down the OS to prevent creative freedom. Unfortunately, a Maya install under Linux isn't as seamless as it is under Windows, so I took some notes when I did my most recent install of Maya on a new Fedora Core system. Here's my attempt to write up the steps. I can't guarantee that these steps will work for you, or that they'll work under software versions other than those I list here. This tutorial assumes that you're comfortable with the basic use of Fedora Core 8, including both GUI-based and command-line based file navigation, plus how to use your "add/remove software" utility. Hardware and software context: - Intel 6600 quad-core CPU, 64-bit capable, 6 GB DRAM - Fedora Core 8 (not 9!) 64-bit version, using the DVD image downloaded from fedoraproject.org in January 2008 - GNOME windows manager within Fedora (this is the default) - Maya 8.0 64-bit version for Linux - GEforce 8800GT video card I don't presently (June 2008) recommend Fedora Core 9 as I had some significant video card driver and ethernet driver problems. The ethernet driver issues have also been flagged by others in user forums. This tutorial is not for the 32-bit version of Fedora Core or Maya, although the steps below are very close to what you'd need to do on the 32-bit version. 1. Install Fedora Core 8 and do NOT choose the option to enable SElinux, the security feature set for Linux. Autodesk's install notes for Maya specifically note that SElinux isn't compatible with Maya. Disabling SElinux on a Fedora Core install where you've already chosen to enable it is beyond the scope of this tutorial, although there are some comments about how to do this in the Fedora Core 3 SElinux FAQ. My notes from an earlier attempt at Maya on Fedora Core 8 say that to disable SElinux, I ran /usr/bin/system-config-selinux and changed the enforcing modes to "permissive", which still make SElinux show all of the alerts but doesn't actually block programs from taking any action. When I installed Fedora Core 8, I also chose one of the options that preinstalls various developer resources -- not the huge set of every X Windows development library, but just the basic developer resources so that I'd get the gcc compiler, Python, and so on. I can't say whether doing so was necessary as a prerequisite to installing Maya, since I haven't tried doing a Fedora Core install and not asking the Fedora installer to install the basic developer tools. 2. Install tcsh. The shell script that you'll eventually run to start Maya requires csh, and tcsh will give you a csh equivalent. To do this, bring up your Package Manager using Applications-->Add/Remove Software from your top menu. Fedora should then ask you to authenticate as root, and then you should see the Package Manager window. Do a Search for "tcsh" and the Package Manager should find it available online. The version I have installed is "tcsh - 6.15-1.fc8.x86_64 - An enhanced version of csh, the C shell". Install this. If you don't do it, your attempts to start up Maya will fail. 3. Install libXp. From your Package Manager, do a search for "libXp" and the Manager should show you several options, most of which are for "libXpm" not "libXp". The version of libXp that I have installed is "libXp - 1.0.0-8.fc8.x86_64 - X.Org X11 libXp runtime library". Install this. If you don't, Maya will die on startup with the error "libXp.so.6: cannot open shared object file: No such file or directory". 4. Install supplementary X Windows fonts. From you Package Manager, do a search for "xorg-x11-fonts-ISO8859-1". This should bring up about 10 different font file choices. If you search on a shorter string than what I suggest here, you'll get a large list of font choices and it will get more confusing. The fonts that you want are the "-1" 75dpi and 100dpi fonts, not the "-14" or "-15" fonts. The fonts that I have installed on my Fedora box are: "xorg-x11-fonts-ISO8859-1-75dpi - 7.2-3.fc8.noarch - A set of 75dpi ISO-8859-1 fonts for X" "xorg-x11-fonts-ISO8859-1-100dpi - 7.2-3.fc8.noarch - A set of 100dpi ISO-8859-1 fonts for X Install these two font files if your Package Manager lists either of them as not yet installed. In my install of Fedora Core 8, I already had the 100dpi file but I had to install the 75dpi file. If you don't install these fonts, you'll get continuous errors of this form when you use Maya: "Error: Failed trying to load font : -*-helvetica-bold-r-normal--10-*-*-*-*-iso8859-1" and you'll lose much of you ability to see text and error messages from Maya at the bottom of the Maya screen. 5. Check your font install. From a shell, go to /etc/X11 and use "less" or any text editor to take a look at you fontpath.d file. You should be able to find three lines that look very much like this: lrwxrwxrwx 1 root root 36 2008-06-07 16:06 xorg-x11-fonts-100dpi:unscaled:pri=30 -> /usr/share/X11/fonts/100dpi:unscaled lrwxrwxrwx 1 root root 35 2008-06-10 22:56 xorg-x11-fonts-75dpi:unscaled:pri=20 -> /usr/share/X11/fonts/75dpi:unscaled lrwxrwxrwx 1 root root 34 2008-06-07 16:06 xorg-x11-fonts-misc:unscaled:pri=10 -> /usr/share/X11/fonts/misc:unscaled If you don't have all three of those lines -- one for 100dpi, one for 75dpi, and one for misc, then you might not have sufficient fonts installed for Maya to function completely. If you don't have these lines in your fontpath.d file, stop here and fix your font situation before moving forward. Working with your fontpath.d file and adding fonts outside of the context of the Package Manager is beyond the scope of this tutorial. However in my install of Fedora Core 8, I simply needed to add the 75dpi fonts (step 4 of this tutorial) and I was good to go, so hopefully it will work for you also. 6. Restart X Windows by logging out of Fedore Core and logging back in, or doing a complete reboot. This step is to make sure that X sees your new fonts correctly. 7. If necessary, adjust your ethernet MAC address. Most people won't need to do this step. Maya 8.0's licensing system locks the Maya license to the recognized ethernet MAC address of the computer that you're running on. If for some reason Fedora is not seeing the correct ethernet MAC address, or if you've got some fancier setup where you use a different ethernet card for Fedora, then you might need to force Fedora to assign a MAC address to your ethernet card that's different from the burned-in-address (BIA) on your actual ethernet hardware. To force Fedora to use a MAC address that you specify, go to /etc/sysconfig/network-scripts and look for the ethernet interface configuration file associated with your (or one of your) ethernet interfaces. In almost all Fedora Core installations, this configuration file will be named "ifcfg-eth0". Make a backup of this configuration file somewhere safe, then edit it (you'll need to be root), and add a new line at the bottom of the ifcfg-eth0 that looks something like this: MACADDR=12:34:56:78:9a:bc where "12:34:56:78:9a:bc" is the MAC address associated with your license key. All you're doing here is changing the 48-bit MAC address that Fedora will associate with the ethernet controller. Please follow all terms and conditions associated with your Maya / Autodesk license. This step is here to help people to work through any legitimate problems with getting your licensed copy of Maya to run on your hardware. If you did need to do this step 7, reboot after you've added the MACADDR line so that the configuration change will take. Then after reboot, from a shell you can issue the "ifconfig -a" command to list the information about your ethernet port. Look for the text towards the top that says "Hwaddr __________", and it should show the MACADDR that you configured. 8. Install Maya! We can finally start to install Maya itself. Put your 64-bit Linux install DVD from Autodesk into your drive, navigate within the Fedora GUI to the "maya80linux64" directory, and install the following. You can generally do an install of each .rpm file by right-clicking on the icon for the .rpm file and choosing "Open with Software Installer". 8.1 Install AWCommon-10.80-7.x86_64.rpm or whatever version of AWCommon..._64 you have. 8.2 Install Maya8_0_64-8.0-179.x86_64.rpm or whatever version of Maya..._64 you have. On my system, this install step (for Maya8) gave some awk errors but still seemed to complete successfully. 8.3 Install the Maya documentation .rpm file. I've misplaced my notes that list the exact file name for the docs, but I believe it's in the same directory as the other Maya .rpm files above. 9. Fix your "windows movement key". No, don't start Maya yet -- first you need to make one change to how the Fedora GUI handles windows. From your top Fedora menu, choose System --> Preferences --> Look and Feel --> Windows and Fedora should bring up the "Window Preferences" configuration window. Within this window, find the section that says "Movement Key" and change it to "Super". The default is "Alt". If you don't make this change, you won't be able to use Maya's standard hold-down-the-alt-key mechanism for camera movement, because Fedora's GNOME window manager will intercept your ALT keypress and assume that you're trying to move the window around. Maya will never see the ALT keypress. 10. Start Maya! The install that you did at step 8 should have created the runable file /usr/local/bin/maya, which will be a symlink to /usr/aw/maya8.0-x64/bin/Maya8.0 From a shell, type: /usr/local/bin/maya Of course if /usr/local/bin is in your path, then you only need to type "maya". The first time you do this, you should get Autodesk's standard license key installation window and utility since you haven't entered your license key yet. Install your license key, and then the next time you type "/usr/local/bin/maya" you should be up and running Maya 8.0. ______________________________________________ KNOWN ISSUES, or at least issues that I have: - When I minimize Maya and then try to unminimize Maya again, it takes 6-30 seconds for the Maya window to appear, and during that time my display is mostly locked up. I can move the mouse around but I can't select any windows or do any work. A similar result happens if I'm using the Workplace Switcher virtual screen system (which installs by default in Fedora 8), then I shift from the active Maya virtual screen to some other screen, and then back. - SpaceNavigator installation for Maya on Linux is ferociously tricky and has a variety of issues: -- No comprehensive install instructions available for SpaceNavigator for Fedora. -- There are undocumented steps to the install process, such as how you need to enable the 3dConnexion driver from your Maya plug-in manager. -- Fedora Core 8 doesn't have some necessary X Windows components required by the SpaceNavigator, and getting those components is a difficult manual process. -- Control window availability for SpaceNavigator both on Fedora and within Linux is unpredictable -- The MEL scripts for SpaceNavigator on Linux Maya are several years old and a full version behind the Maya-for-Windows MEL scripts offered by 3dConnexion. There are a lot of features missing from the Linux version. -- When the SpaceNavigator plug-in is active in Maya, it breaks Maya batch rendering! All batch renders will fail and you'll get a "maya encountered a fatal error Signal: 11 (Unknown Signal)" in your mayaRenderLog.txt file. ______________________________________________ BONUS appendix: how to install drivers in Fedora Core appropriate to your Nvidia card (if you're using an Nvidia card...) I purchased a GeForce 8800GT video card for use with my Fedora Core system, and then had to spend some time to determine the best way to actually get correct video drivers for it. You'd think that the right thing to do would be to download Nvidia's Linux driver set from www.nvidia.com, but research in forums suggested that this wasn't the right choice. Instead, several users recommended the use of the "Livna" driver set, which appears to be based on the official Nvidia release but is different from that release. To be able to use your Fedora Package Manager to install the Livna driver set, you first have to add to the Package Manager configuration itself. Here's the full process. 1. Set up your Package Manager to use Livna. In a browser, go to http://rpm.livna.org. You should see a section of the resulting web page titled "Repository RPMs" and one of the choices in that section should be "Fedora 8 repository RPM". Click on the link, and your browser (I'm using Firefox) should give you a dialogue box that asks you what to do with the .rpm file. You can then save the .rpm file to disk, then install it by right-clicking on the .rpm file's icon in the Fedora GUI. 2. Confirm the setup. Bring up the Package Manager using "Applications --> Add/Remove Software" from your top menu. Within the Package Manager, choose "Edit --> Repositories" and you'll get a list of all of the repositories that the Package Manager knows about. Scroll down in this list and confirm that there are several new repositories that start with the name "livna-". Now close the Repository Manager edit window. You don't need to edit anything. 3. Install the Nvidia drivers. Within the Package Manager, do a search for "kmod-nvidia". You should get a huge list of choices, so many that it will be difficult to find the right choice. What you want is the metapackage which has the largest version number, and which has a "_64" at the end of it since you're running the 64-bit release of Fedora Core (you are, right?) On my system, the metapackage that I have installed is: "kmod-nvidia - 173.14.09-2.lvn8.x86_64 - Metapackage which tracks in nvidia kernel module for newest kernel". Install this metapackage, and the metapackage should then automagically pull in the "kmod-nvidia" release appropriate to you kernel. I've found that even when I upgrade my kernel to newer sub-releases of Fedora Core 8, that this approach of using the metapackage appears to automagically hunt down and install the correct new release of the kmod-Nvidia drivers for me at the same time that the kernel upgrade happens. |
apcw: error while loading shared libraries: libXrender.so.2: cannot open shared object file: No such file or directory
apcw: error while loading shared libraries: libXrandr.so.2: cannot open shared object file: No such file or directory
apcw: error while loading shared libraries: libXcursor.so.1: cannot open shared object file: No such file or directory
apcw: error while loading shared libraries: libXinerama.so.1: cannot open shared object file: No such file or directory
apcw: error while loading shared libraries: libXft.so.2: cannot open shared object file: No such file or directory
apcw: error while loading shared libraries: libSM.so.6: cannot open shared object file: No such file or directory
查看安装包已安装libXrender等64位版。解决方法是将i386版同时安装就可以了。


Linear Workflow (线性工作流程)
1, 什么是线性工作流程?
线性工作流程确切的说是匹配软件的线性工作流程。这种流程在近几年被广泛应用于电影广告等高端项目。国外大型工作室几乎都是基于这种流程。实际上我们需要物理上正确的计算,那只能是基于线性工作流程。不幸的是,我们以前都不是基于这种流程。就是说理论上我们以前和现在几乎所有的maya渲染,后期制作都是基于错误的计算方式。能够接受它是因为我们在错误的基础上让它看起来“好看”(其实并不正确)。
那么具体什么是线性工作流程呢?线性工作流程就是软件在计算时,所有参与计算的数据都是基于线性的。我们使用的几乎所有图像处理软件都是基于线性的计算方式。就是说 1+1=2 2*2=4 128+128=256。我们使用的maya, max,nuke,shake,fusion,photoshop,mentalray, maxwell都是这种计算方式。这种流程的正确的前提是它在计算前所有的素材,条件,灯光都是线性数据,1代表的是1,5代表的是5。但是我们现在的流程是非线性的(错误的)。主要原因:
输入的是错的。(素材是非线性的sRGB空间。)
操作是错的。(基于错误色彩空间进行测试maya操作(打光,渲染,输出)。输出的图片是线性但在sRGB空间下观看。)
2 + 2 = 10 (灯光师的感觉,灯光易爆)
不能应用2次方衰减
Mentalray的物理渲染
取色器。
所有对材质的调整
输出是错的。(输出的是线性空间下的8bit 16bit图,但不进行调整)
2,基本概念
如果我们要充分理解线性工作流程首先需要弄清几个概念。Linear,sRGB, gamma,windous 色彩管理,显示器部分原理,眼睛的部分感官特点,8bit, 16bit,32bit.
3,先从显示器说起,我们常说“CRT显示器的gamma是2.2,苹果是1.8”这种说法是不正确的。
什么是gamma?gamma是一个非常模糊和不精确,被乱用的一个概念,现在其已经几乎被禁止使用的一个单位。它最早是用来表述胶片曝光的log曲线和胶片线形密度的关系。后来被各种工业部门用来表述类似的关系,数学上大概可以表示为:
y = xr(2.2)
曲线的形式
我们常用的CRT显示器,不论他是苹果的还是什么的出场的时候本身的物理gamma值都是2.5。主要原因是撞击显示器荧光粉的电子强对于电压的反应不是线形。大概可以用gamma 2.3 – gamma2.5来表示。而如果我们应用这种显示器看图片,图片明显看起来会暗很多。所以不同的应用领域对此作了相应的补偿,video主要是在摄像机里进行了gamma2.2的矫正,PC电脑在framebuffer之后进行了gamma2.2的矫正。Mac分别在framebuffer之前进行了和之后分别进行了矫正。那么显示器的gamma是2.5我们只给了2.2的矫正剩余的2.5/2.2 gamma1.136是用来匹配人类视觉感知的。人眼有这么一个特点:
同一块颜色在暗的背景下和亮的背景下看,给人亮度的感觉是不一样的。在暗的背景下感觉会更亮一些。而我们正常的显示器一般都是在较暗的背景下看的。在标准的测试环境下gamma1.136正好可以抵消这种视觉偏差。所以我们在理想情况下看到的显示器是线性的。
(如果我不说显示器的gamma,不了解的人会以为显示器有gamma,这样一来很多理论会说不同。)
那么我们正常情况下所说的“CRT的gamma是2.2”指的是什么呢?这就涉及到了windows色彩管理:默认的sRGB。我们目前的显示器只能显示8bit图,大多数显卡的framebuffer 也只能处理8bite数据,就是说超过8bit的图片显示器是不能完全显示出来的。
就是说我们只能给显示器8bit的图,这就出现了一个问题。又是人的眼睛。
正常人眼察觉明度差别的边界是1%,就是说如果两块颜色明度差别超过1%我们的眼睛感觉到边界。图片里就会出现边界线条。那么8bit的图在100色阶以下,明度对比都超过1%,在较暗的场景里就会出现很多的颜色边界。那么这是发生在 linear 8bit空间下的。linear就是说0是最暗,1是最亮,0.5是中间亮度。为了解决暗部色阶不够明度差别过大我们只有将更多的空间分布给黑暗的区域才可以取消这种差别。如果是线性需要大概14bit的数据,而亮部很多数据是无用的。这就引进了非线性空间。
sRGB是微软和惠普联合开发的一个色彩管理标准,目的就是在多平台,多设备下能够很好的显示图片。基于硬件的局限它被定义在8bit,最大值为1不可以超过1。
这个色彩管理标准将更多的空间给了暗部,解决了暗部色阶不够问题。而这个曲线恰巧去gamma2.2极其匹配。Window应用这种色彩管理标准作为默认设置。因为window知道sRGB空间的特点所以它能够正确地显示sRGB的图象,比如这个像素的值是0.2他会让显示器发出0.12倍的电压。我们日常应用的大多数8bit 16bit图片都是基于这个标准的,比如最常用的jpg,tif,targa 等。
因为gamma2.2和sRGB的曲线非常接近,我们很多情况下的色彩空间转换,匹配都应用一个简单的gamma2.2操作。sRGB很好,它能很高效的应用数据显示图像,但是在我们进行图形操作的时候会出问题。因为sRGB是非线性空间。 因为他把更多的值给了暗部,0.5并不代表0.5而是0.21左右。但是我们日常应用的软件并不知道他读入的图片的色彩管理模式它全部以linear空间来进行计算。这时候就出问题了。
在3d渲染得时候出错的地方
2 + 2 = 10 (灯光师的感觉,灯光易爆)
不能应用2次方衰减
Mentalray的物理渲染
取色器。
所有对材质的调整
测试观察的图片时错误的
Etc
后期操作时再不转换色彩空间的情况下各种操作也不够精确。(也就是错误的)。
在这里首先要说一点。Maya,mentalray, renderman,等大多数渲染器渲出来的8bit, 16bit图片都是linear的。也就是说没用经过gamma矫正(转换到sRGB空间)。而我们是在windows默认sRGB空间下观看。我们只有在sRGB空间下看sRGB空间的图片才是正确的。
在sRGB空间下看线性图片的问题(二次方衰减)。涉及在sRGB空间下看linear图片的问题。对比曲线,指出sRGB色彩管理会将linear图片变暗显示,因此我们要正确显示linear图片需要将其变亮,因此给一个gamma 0.45454的值。这也是我们为什么不能应用灯光二次方衰减的原因。我们如果需要将linear图片变亮,只能不断的提高强度而我们输出8bit图,值只能卡在第256个色阶上,所以我们以前不能应用二次方衰减。
用曲线表示两个sRGB值相加的问题2+2=10。一幅图片上两个像素点。在sRGB上分别标出两个点的位置对应指出他们在sRGB曲线上和linear曲线上分别对应的值,分别相加。想象得到的这个值是用sRGB来显示的会是什么样的?这是个简化的相加原理。指出渲染器取的值是linear 上的值。
mentalray的物理渲染要求更精确如果素材错误结果很难调整。
我们的取色器是错误的
具体应用方案:
因为我们已经理解了原理,具体解决方案就不会晕了。
首先介绍两个节点。Gamma correction node, mia_exposure_simple
比较理想的解决方案:基于32 bit float point 输出,这样我们就不需要考虑输出时gamma矫正的问题,这部分在后期里操作。
输入:对所有非linear图片进行转换。
照片和photoshop处理的图片基本上都是gamma2.2。给以gamma0.455的矫正。
3d输出一般都是linear。不需矫正。
Bump,displacement不需矫正。
32bit float point. Openexr,hdr,一般是linear不需矫正。
测试察看:
Mentalray: 加一个mia_exposure_simple.
Maya software: batch输出tiff16, 在后期里矫正察看。
输出:
Mentalray: 8bit 16bit 加mia_simple_exposure 或photographic(比较复杂)。因为这是在mentalray内部浮点形式进行的gamma0.4545转换。在后期里会有损失但是对于16位可操作余地更大。
Mentalray:32 bit float point 不加任何节点,直接输出Openexr格式。在后期里进行调整。
Maya software: 输出tiff 16 在后期里进行调整。
例子:一个标准的操作。
Openexr的优势:
Simplified pixel math
Rendering
Filtering
Transformations & Drawing
Color correction
Openexr 例子,
Nuke基于线性操作更精确的例子。